Ever wondered why two different relay testers can give slightly different readings for the same relay? It’s not magic; it’s calibration, or sometimes, the lack of it. If you rely on relay testers to keep your electrical systems safe and responsive, calibration is the difference between trust and guesswork. Let’s go through how to calibrate a relay tester step by step, what tools you’ll need, and what mistakes to avoid so your tests are always accurate.
Why Calibration Deserves Attention
Calibration isn’t just about numbers; it’s about confidence. A relay tester that isn’t calibrated may still light up and run, but its measurements can drift over time. Those small errors turn into big problems when protection relays trip too early, too late, or not at all. That’s why professionals treat calibration as part of their maintenance routine. It keeps every test aligned with real-world performance.
A big part of the relay tester price you pay often reflects how accurate the instrument is straight out of the box. Some higher-end testers even include calibration certificates. Still, temperature changes, transport, and regular wear can cause drift, so it’s smart to recalibrate regularly. Calibration ensures that what you see on the screen matches what’s happening inside the relay.
Understanding the Relay Tester

What It Really Does
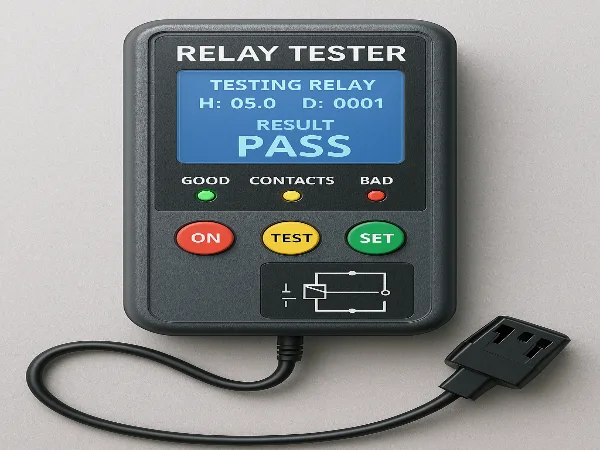
A relay tester is a diagnostic device that simulates operating conditions for relays and checks how they behave. It can apply controlled voltages or currents to the relay coil, measure pickup and dropout points, and record timing responses. In industrial environments, it’s a vital piece of equipment for preventive maintenance and troubleshooting.
If you’re curious about how professionals work with these tools, take a look at Industrial Electrician UK: A Beginner’s Guide from One Spark to Another. It’s a great resource for understanding the basics of electrical testing and how it fits into everyday fieldwork.
The Types You’ll See
There are a few categories of relay testers you’ll come across:
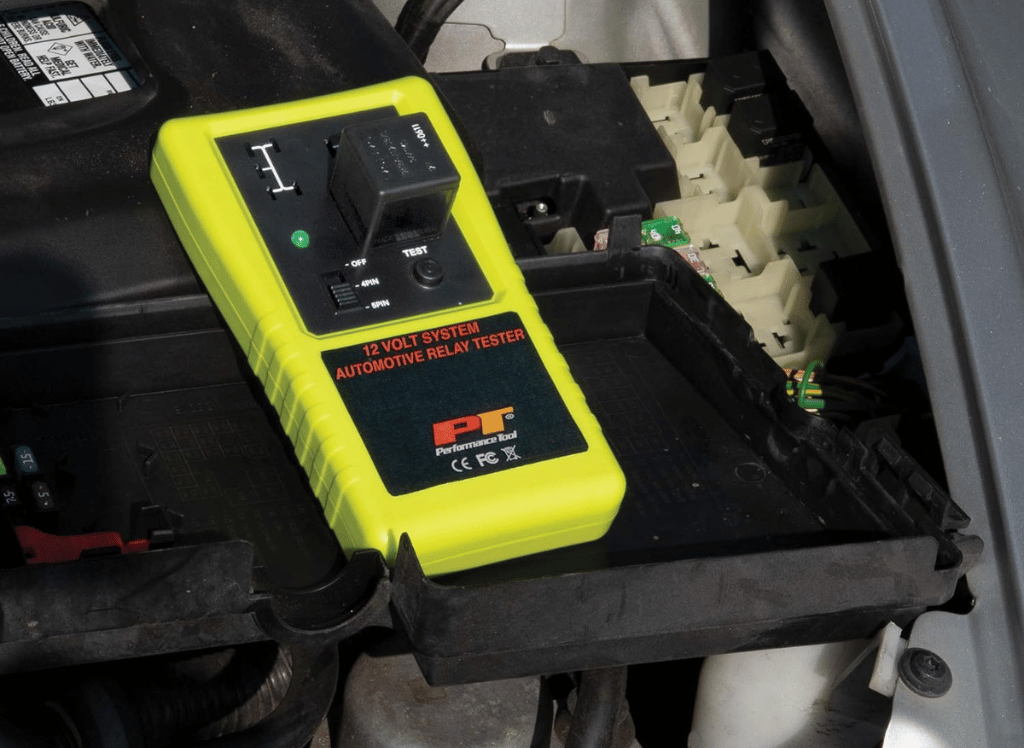
- Automotive relay tester – A small, handheld tool built for 12V automotive relays, usually with four or five pins. These are simple, inexpensive, and ideal for quick checks.
- Protective relay tester – The heavy-duty version used in substations and industrial plants. It can inject high voltage or current to simulate real faults and verify protection relays.
- Bench relay tester – Used in labs or workshops for controlled, repeatable testing on various relay types.
When you search for a relay tester for sale, you’ll notice a wide price range. An automotive relay tester can cost around $18.99, while a professional power-system relay tester can run into thousands. For example, brands like Relay Buddy are often listed at around $80. The big difference is precision, durability, and feature set.
Preparing for Calibration
Before touching a screwdriver or software setting, gather the right tools. You’ll need:
- A reference standard (a calibrated voltage or current source).
- A precision multimeter with high accuracy.
- A few known, high-accuracy resistors.
- A reliable power supply.
- A stable testing environment with minimal temperature fluctuations.
You’ll also want to document your results, recording both “as found” and “as left” readings. This helps you see how much drift occurred and whether your adjustments worked.
Step 1: Initial Checks
Visual Inspection
Start simple. Check cables, leads, and connectors for damage. Inspect the relay tester itself; loose knobs, worn jacks, or corrosion can affect your readings.
Warm-Up
Let the tester warm up for 20–30 minutes before calibration. Components need time to stabilise, and skipping this step leads to inconsistent readings.
Measure the Zero Point
Set your tester to output zero volts or amps, then check with your multimeter. Any small residual output indicates offset drift. Adjust or note this before proceeding.
Step 2: Calibrating Voltage and Current Outputs
Relay testers rely on precise voltage and current output to simulate real operating conditions. Here’s how to check and correct it:
- Use your reference standard to generate a known voltage (say, 12V).
- Command your relay tester to produce that same output.
- Measure the actual output using your precision multimeter.
- Calculate the difference between the expected and measured values.
- Adjust internal calibration controls or use built-in software to fine-tune.
- Test at several points, low, mid, and high range, to confirm accuracy.
For testers that output current instead of voltage, follow the same method using a current reference and precision ammeter.
Step 3: Timing Accuracy
Timing is everything when it comes to relays. The tester should measure pickup and dropout delays accurately. To check timing:
- Connect the relay and set up a stimulus that triggers its coil.
- Use a timing reference device or oscilloscope as your benchmark.
- Compare your relay tester’s timing measurement against the reference.
- Adjust offsets if there’s a consistent deviation.
Repeat this across multiple cycles to confirm stability. Protective relay testers often include software-based timing calibration options for more advanced testing curves.
Step 4: Contact Resistance
When a relay switches, the contact resistance should stay low and consistent. A good calibration includes this check.
- Connect a known precision resistor across the tester’s measurement terminals.
- Run the tester’s resistance measurement function.
- Compare the result to your known value.
- Adjust the calibration if the readings are off.
This step is often overlooked but critical. High contact resistance can mask relay issues or lead to false conclusions about relay condition.
Step 5: Functional Verification
After calibration adjustments, test several relays that you know are in good condition. Run pickup and dropout tests, monitor timing, and note any unusual readings. Consistent, repeatable results mean your calibration is good.
You might also simulate different fault conditions to ensure the tester responds properly. Protection engineers often use this step to confirm performance after calibration.
Step 6: Documentation
Once everything checks out, document the calibration process. Include:
- Tester model and serial number.
- Reference standards used.
- Environmental conditions.
- Before-and-after readings.
- The name of the technician who performed the calibration.
If you perform calibrations for compliance, attach a certificate or calibration label showing the date and due date for the next check.
Routine Maintenance and Calibration Intervals
Even a perfectly calibrated relay tester won’t stay perfect forever. Electrical components age, temperature cycles take their toll, and mechanical stress shifts readings slightly. Most professionals schedule calibration every 6–12 months.
Quick verification before each major testing project is also smart. A 10-minute check can save you from a full day of questionable readings.
Buying the Right Relay Tester
If you’re in the market for one, compare not just the relay tester price but also accuracy specs, user interface, and after-sales support. A cheaper tester may save money upfront, but costs more in wasted time or inconsistent results later.
Look for testers that include self-calibration modes or offer calibration kits. The automotive relay tester category is great for quick 12V checks, while bench or protective testers are essential for industrial or utility-scale work.
You can explore options at Jorbina, where you’ll find insights on electrical tools, calibration practices, and practical guidance from professionals working across the UK.
Why Calibration Is Worth the Effort
Calibration ensures every test result has meaning. Without it, you might think a relay is healthy when it’s not, or vice versa. Consistent calibration builds trust in your data, and that trust translates to safety, reliability, and credibility.
Even in the automotive world, where relays seem simple, calibration makes sure your tester isn’t misleading you. In industrial settings, where downtime costs money, accurate testing prevents both unnecessary replacements and dangerous oversights.
The bottom line is simple: calibration is about control. When you know your tester is correct, you can focus on the relay, not the tool.
FAQs
What is a relay tester?
A relay tester is a device used to check how relays respond to specific electrical conditions. It applies voltage or current to the relay coil and measures how quickly and accurately the contacts open or close.
How do you test if a relay is bad?
You can use a relay tester or a multimeter. Apply the proper coil voltage using the tester, then see if the contacts switch. A relay that doesn’t click, has inconsistent timing, or shows high contact resistance is likely failing.
Are relay testers worth it?
Definitely. If you test relays often, they save time and ensure precision. Manual testing is fine for a quick check, but relay testers give repeatable, measurable data that supports maintenance and quality control.
What do you mean by relay testing?
Relay testing involves applying a controlled electrical stimulus to a relay to verify its performance. It checks pickup, dropout, timing, and resistance under realistic operating conditions. It’s standard practice for industrial and automotive technicians.
What are common relay failure symptoms?
- Contacts burn or wear out.
- Coils lose insulation or short out.
- Timing becomes erratic.
- The relay fails to energise or release.
- The relay buzzes or chatters during operation.
Each symptom points to a different underlying issue, but accurate testing is the key to spotting them early.
Wrapping It Up
Calibrating a relay tester may sound technical, but it’s really about consistency and peace of mind. Start with basic checks, confirm voltage and timing accuracy, verify resistance readings, and document everything. Once you’ve done it a few times, it becomes second nature.
So whether you’re an automotive technician testing 12V relays or an industrial electrician verifying protection systems, a well-calibrated relay tester keeps you confident in your results. Calibration may take time, but the payoff, trustworthy data and safe systems, is worth every minute.